


Freeware

Introduction to the Windows Operating System Some Terminology Introduction to the Windows 95 and Windows 98 Operating Systems In this section we will discuss some very specific aspects of the
Windows 95 and 98 operating systems. Keep in mind that you can do many of the same types
of things on different operating systems. The only difference is in the way that the
operating system allows you to perform the task. Keep in mind that the appearance of your
OS installation could be a little different from the examples given in this tutorial
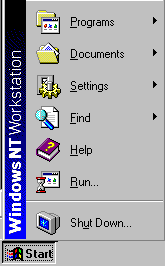
because the OS allows you to customize its appearance to your liking. Let’s start at the most obvious place, the Start Menu which
is located in the lower left hand corner of the computer screen when Windows 95 or 98 is
running. Single click on the Start button with the LEFT
mouse button to display the following menu items. Note that my example says "Windows
NT Workstation". Your computer should say Windows 95 or Windows 98. Let’s start from the bottom and work our way up. It is literally impossible to go over the Programs
sub-menu in any detail because the contents of this sub-menu will vary vastly from
computer to computer. The Programs menu can be configured ANY way a user wants it to
appear. The important thing to understand is that the sub-menu’s and buttons under
the Programs menu are simply LINKS that point to the actual programs that get run
when you click on them. Desktop The desktop of the Windows 95/98 operating system is symbolic of a
table desktop. Just as you can open up folders and documents on your office desktop, you
can do the same thing on your Windows 95/98 desktop. When opening up documents, you are
basically covering up your desktop with papers and items. It therefore becomes necessary
to Close or Minimize programs and files on your computer if you need to view
the Windows desktop. The following is only an example of what your desktop might look
like. All of the items on your desktop can be renamed to be titled something
else. Don’t expect the above items to have the exact names as they do above, but most
windows desktops have the above 3 items, or ICONS, on the desktop. Task Bar Located directly to the right of the Start menu, is the task
bar. The task bar starts out with nothing on it when you first log into your computer.
When you open up an application, the application will place a link to itself on the task
bar. This way, if you have multiple applications or programs open at once, you can simply
click on the link in the task bar to switch between them. In the previous example, there
are 3 application links in the task bar. Another important thing to remember about the Windows operating systems
is that there is almost always more than one way to get something done. The way that
I’m going to show you in the following examples are simply MY preferences on how to
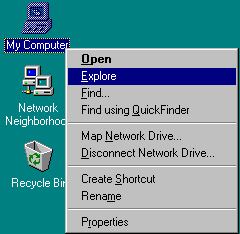
use the Windows OS. Browsing Your Computer Many people "Double Click" on the "My Computer"
ICON on the windows desktop in order to open it up and browse around. The reason that I do
NOT do this is because in the standard Windows environment this would open up a new Window
every time you "Double Clicked" on a sub folder. For this reason, "Single
Click" on the "My Computer" ICON with the right mouse button and choose
"Explore". The Windows Explorer is a much more powerful way to browse through
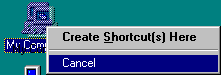
your computer files and devices. If you get the following menu upon right clicking on My Computer, then
it means that you clicked on My Computer and dragged the ICON a little before you released
the mouse button. If this happens to you, simply click on "Cancel" with the left
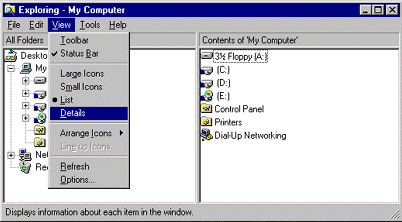
mouse button and try again. Be sure to hold the mouse steady while clicking. A window similar to the following should have appeared after you
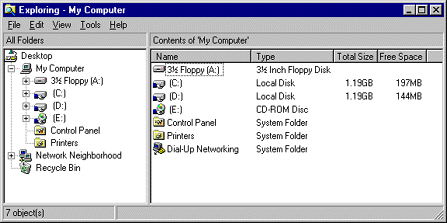
clicked on the Explore option. The left frame of the Explore window is a list of devices,
folders, and other Operating System objects like the Recycle Bin. The right frame is a
list of what is contained in the object that is currently selected in the left-hand frame.
In order to display the FULL details of the Files and Folders listed in the right frame of
the window, select "Details" from the View menu of the Explorer window. You should now see details about the files and objects in the right
frame. The following is an example. Notice that there is a Minus (-) sign next to "My Computer"
in the left frame. This indicates that the Object is expanded to show you what folders and
objects are inside. Notice all of the other Objects, like the C, D, & E drives have a
Plus (+) sign next to them. This indicates that the Objects are NOT expanded and you
can’t see what’s contained within them. If you were to click on the Plus (+)
sign next to the C drive, you would see it expand to show you all of the sub-folders
contained in the C drive. If you were to single click on the C drive itself, the
right-hand frame of the exploring window would show not only the sub-folders in the C
drive, but it would also list any files which exist in the top level of the C drive.
Remember our first analogy of seeing your computer as a filing cabinet. In the scenario
just described we have opened up the C drawer of our file cabinet but have not opened up
any of the sub-folders in our C drawer yet. If you followed the above steps by expanding the C drive and viewing
the folders and files in the top level of the C drive, then you have successfully browsed
to the C drive of your computer. Networking to share information instead of the
Floppy Diskette As previously mentioned, computer users used to exchange
and share information by copying information to a floppy diskette. However, this is not
necessary in a company which has their computers connected together on a network [Like a
small Internet]. You can create a LINK to a Disk Drive [Folder] on another computer on the
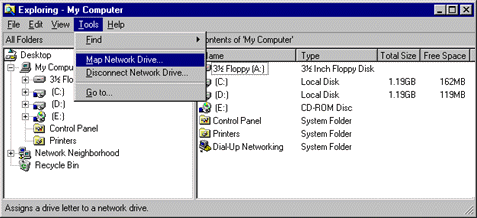
network and access that drive as if it were physically located inside your computer. Mapping a Network Drive From the Explore window that you opened earlier, choose the
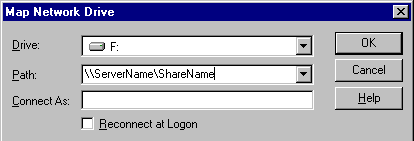
"Map Network Drive" from the Tools menu. In the new window that appears, you’ll need to
provide the following information. In the above window, I am telling Windows that I want to map the
ShareName resource that is located on the ServerName system to my F drive. I can
optionally fill in the Connect As field if I don’t have access and need to connect as
someone with the appropriate access to the share name. I will be prompted for a password.
Finally, if I want this drive automatically mapped every time that I log in to my
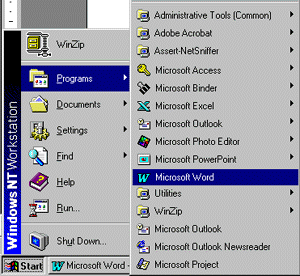
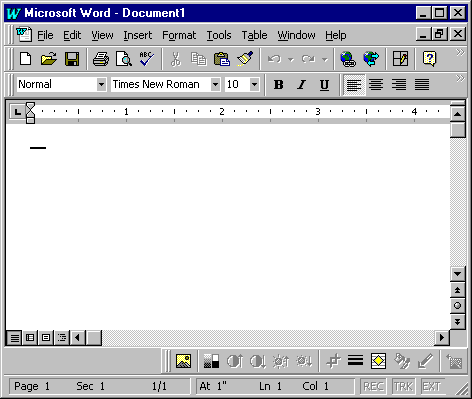
computer, I can check the Reconnect at Logon box before clicking OK. Common Application Examples This section will discuss some common applications/programs that are used on PC’s. Once you learn your way through one or two programs, it shouldn’t be too difficult to tackle other programs. Understanding the underlying concepts will help you to learn new applications/programs. Microsoft Word Microsoft Word is basically a glorified word processor. It is a replacement for the typewriter. In the past, when a person made a mistake while using a typewriter, you would have to use correction tape, and retype over the misspelling to cover up your typing mistakes. With computers and applications like MS-Word, all you have to do is hit the backspace key to delete your typo. MS-Word comes with tons of other features, including spell checking and grammar checking. Rather than make this a course on Microsoft Word, I’m not going to spend a great deal of time explaining how to do certain things in Word. Instead, I’m going to focus on the commonalties that Word has with other PC applications. The intent is to help you understand better how to use ALL the applications on your PC, not just MS-Word. As stated previously, most applications will create a LINK to itself on the "Programs" menu of the "Start" button. Locate the Microsoft Word link and single click on it. It should look something like the following.
Once you’ve opened up MS-Word, MS-Word may be setup to automatically create a new blank document in the workspace. If not, you can select "New" from the "File" menu in Word window. For our tutorial here, it is not necessary to have an open document.
The Windows OS got its name from the fact that anytime you open up an application or file, a new window looking object opens up on your Windows desktop. These windows typically have some basic things in common with each other. They have a title bar that describes the application, and current working file or document. In the above example, the title bar states, "Microsoft Word – Document 1". The application is "Microsoft Word", and the current working file is "Document 1". Remember that Word may have automatically created this blank new document for you. Document 1 is the default name that Word assigned to this new working document. In the upper right hand corner of the window, there are three small boxes that can be clicked upon to manipulate the appearance of the window.
Clicking the first button [the line] will cause the application to MINIMIZE itself to the taskbar. If you needed to reveal an application behind the current working application, you could click on the minimize button to move the current application out of your way. Clicking the middle button [box or boxes] will cause your application to either EXPAND and use the full space on the desktop, or COLLAPSE to a smaller window leaving some background items on your desktop visible around the edges of the window. Clicking on the third button [the X] will cause your application to CLOSE. Although most applications will prompt you to save your working document, be careful when clicking on this X. It could cause your application to exit without saving your work. To exit cleanly choose EXIT from the FILE Menu. Just below the title bar of a window, there are typically some Menu’s that allow you to perform certain functions within the application. Many applications will have the three menu’s FILE, EDIT, & HELP. Because most applications work with files, it makes sense that they follow the same standard for certain functions. This makes it easier for users to learn a new application. Here are some examples of menu items that perform the same function no matter what application you are using.
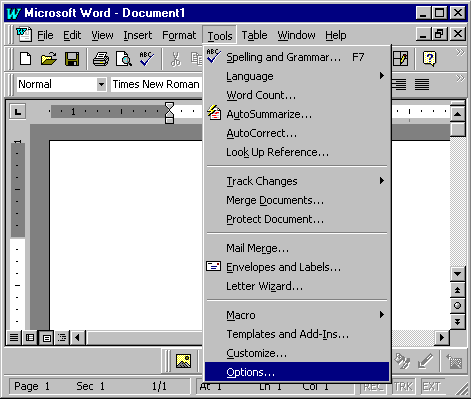
The clipboard is an invisible Windows OS storage area that you can use to temporarily store information such as text and images. Many applications, like MS-Word can be configured to your liking. By default MS-Word automatically spell checks documents and will offer suggestions while you are typing. This can be a rather annoying feature at times, but you can turn this feature on or off depending how you work. These settings are typically found in menu items called Preferences, Options, or Settings. In MS-Word, the item is called Options, and is located under the Tools menu.
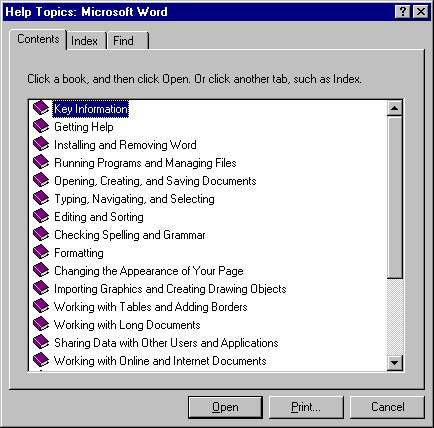
Most applications will provide some form of online help. There are two types of help that they may provide. Contents & Index. You can select this contents and index help option from the Help menu in MOST (not all) Windows applications. The window that opens up will look something like the following.
Some windows that are opened up within an application, like the above help window, don’t use menus. They use TABS instead. Window TABS are symbolic of folder tabs you might find in a binder. The tabs in the above example are Contents, Index, and Find. By clicking on the Contents tab, you are able to open up virtual books about the application you chose help on. The starting books in the above example are Key Information, and Getting Help. You can browse through these books for specific topics to learn more about the application. If you want to search through ALL of the books for a specific topic or word, then you can click on the Index tab and enter in a keyword to search for. The index is helpful in getting quick answers to a specific question you might have without having to page through the online books in the contents area. Short Cuts Most applications offer shortcuts for commonly used functions like Cut, Paste, Save, and Print. These shortcuts help you work faster by removing the need to drag the mouse around. Notice that on the menus within Microsoft Word, the first character of each menu item is underlined.
The underline indicates that there is a shortcut key to that menu. To access the shortcut keys to the menus, click and release the ALT key, then press the underlined letter of the menu you wish to access. For example, click the ALT key, then click the F key. This should display the File menu.
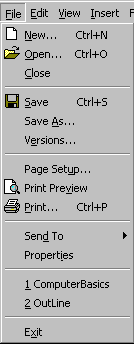
Next, in order to select any of the menu items under the opened file menu, you can type any underlined character in the file menu. In the above example, if you wanted to save your current document using the short cut, you could enter in the key sequence ALT, F, S. Notice in the above example, the Ctrl+S text that is next to the Save option under the file menu. This indicates yet another short cut to this function. The PLUS sign indicates that you need to hold down BOTH keys together in order to execute the function. So, by holding down the CTRL key and typing S at the same time you can save your current working document. You now have three ways that you can save your working document. By clicking on the file menu with the mouse and choosing the Save option, by using ALT-F-S, and by using Ctrl+S. When using the ALT key to gain short cut access to the menu system, you can use ALT again to exit from the menus, and you can also use the arrow keys to navigate through the menus without using the mouse. Important Tips and Instructions Backing up your data You have learned that when you save a document on your desktop computer, it is saved on a bunch of tiny magnets as charges and non-charges. Well, what happens if an electrical surge comes down the power lines and demagnetizes all of the tiny magnets? You guessed it, you loose ALL of the information stored on your hard drive. Humans do not make PEFECT products either. What happens if the hard drive breaks or the surface of the magnets gets scratched because of a malfunction in the hard drive? Again, you’ve lost your data. It is therefore important make sure that your data is being backed up. IMPORTANT! Information Services does NOT backup your computers C drive for you. This is why it is important to save your documents on one of the shared network drives available to your department. These shared drives are backed up on a nightly basis to ensure that we have a backup copy of everything done for that day. NOTE! What happens if you accidentally delete a document at 4pm that you’ve been working on since 9am? You’ve lost all your work. Backups do not typically take place until after 5 or 6pm. You can typically ask that a file be restored from the previous day, but not from the same day. Back to Top |